This article summarizes the steps required to add a webinar or session as part of your virtual booth.
Depending on your specific event, exhibitors have the opportunity to host webinars or sessions. The webinars can be either live or pre-recorded and there are a number of options available regarding the technology used to host them.
Webinars will be accessible from within the exhibitor's virtual booth. When an attendee clicks to join the webinar they will be taken to a separate webinar room, where they can view the session and chat with the representative associated with the session (if the chat feature has been enabled).
Webinars will also be listed as part of the main event agenda and available from both the agenda heading within the sidebar and within attendees dashboards. If these options do not appear they may have been disabled for your specific event, in which case you will need to contact your event organizer.
To add webinar:
- Log into your admin account.
- From the left hand side setting options click the Webinars.
- When the Institution Webinars page opens click on Add Webinar.
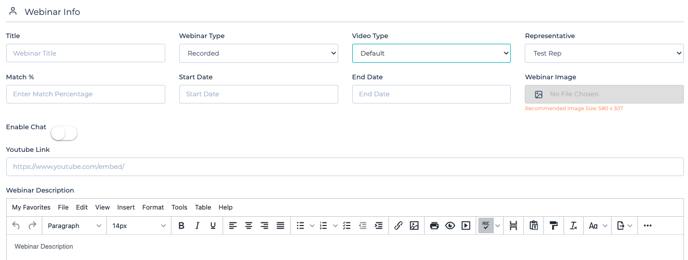
- Select the following options:
- Title - This will be the webinar title and visible to attendees.
- Webinar Type - This determines the type of webinar. There are a number of options available in the drop down menu but only a few are applicable:
- Recorded - Used for YouTube hosted videos with group chat
- One-to-One Recorded - Used for YouTube hosted videos with group chat disabled
- Vimeo - Used for Vimeo hosted videos with group chat
- Live Webinar - Used if the Live Webinar app is being used
- MS Teams - Used if MS Teams is being used
- Embedded Webinar - Used if the webinar is embedded within the platform
- One-to-One Embedded - Used if the webinar is embedded within the platform and group chat is disabled
- Conference Webinar - Used if you are using the Conference feature within the platform
- MS Teams Direct - Used if you are using a direct MS Teams link
- Link Webinar - Used if you are providing a 3rd party link to a session
- Video Type - Selects the webinar room (if there is multiple)
- Representative - From the drop down menu select the representative that will be associated with the webinar.
- Match % - A number between 1 and 100. The number will determine what the minimum percentage an attendee needs to match with this particular webinar.
- Start Date - This is the start date and time for the webinar
- End Date - This is the end date and time for the webinar
- Webinar Image - This is a specific image for the webinar
- Enable Chat - Enables or disabled chat for the sessions
- If this option is enabled then the type of chat (group or private) will then be dictated by the Webinar Type chosen.
- Media Link - Add the unique link for the session.
- Webinar Description - Add an informative and enticing description for the session
- Click Save.
NOTE: The type of webinars that are available to select can be enabled and disabled. If you have any questions regarding the webinar types please contact your event organizer.
Add Webinar window: